The Obsidian Developers imagined Obsidian as an IDE for Thoughts and Notes, which makes it super extensible by design.
Obsidian is made using Web Technologies, or more specifically TypeScript, HTML, and CSS. The Desktop Application uses Electron and thus also NodeJS under the Hood, while the Mobile Apps are using CapacitorJS.
In this Post, we will be recreating one of my first Obsidian Plugins, cycle through Panes.
Getting things set up
To create your first Obsidian Plugin, you need to have:
- NodeJS installed
- A Code Editor of your choice installed (My personal recommendation would be: Visual Studio Code)
If you want to publish your Plugin someday, you also need the following:
- Git, a Version Control System
- A GitHub Account
You will be using Git to version your Plugin and also to push and pull changes from the remote Repository, which is basically just a “Folder in the Cloud”. In the End, I will tell you more about how to publish the Plugin, so that other people can install it from inside Obsidian.
The next step would be to clone the official Sample Plugin from GitHub.
With Git and GitHub
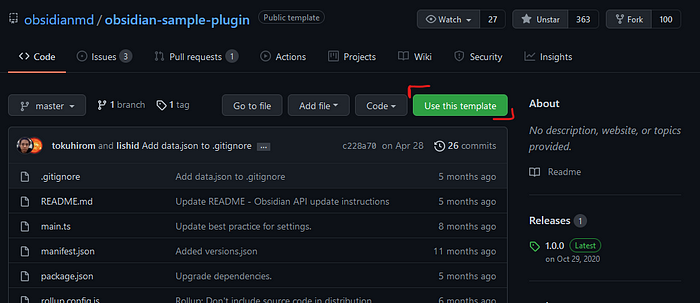
If you have a GitHub Account, just click the “Use this Template” Button and follow the Instructions:
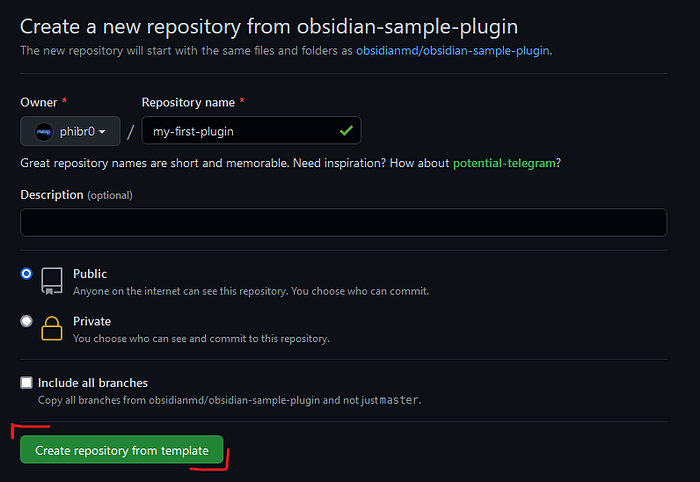
Once you have your own Repository set up, just copy the following URL:
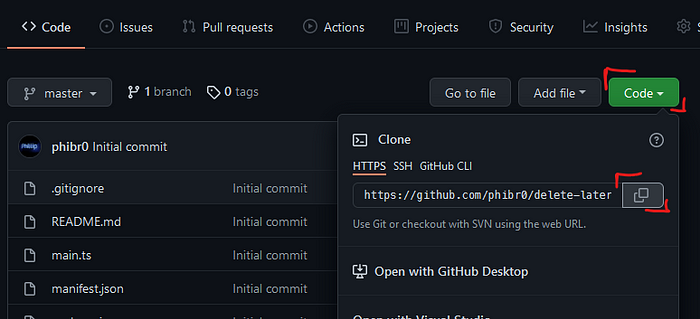
Afterwards, you can clone the Repository locally using the following shell command. Just make sure you are in the correct Directory you want your Plugin to live in.
git clone <paste the url here>Now you can finally open the Folder with your Code Editor.
Without Git and GitHub
If you don’t plan on publishing your Plugin or don’t have a GitHub Account, you can also just download and unpack the Sample Plugin as a ZIP Archive:
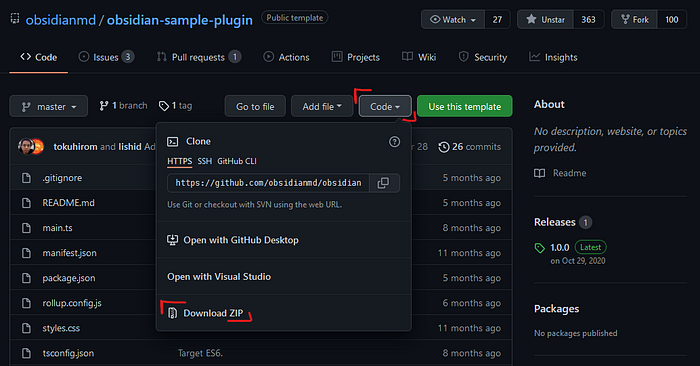
Now you can open the Folder with your Code Editor, too.
Compiling and running the Plugin
You will see, there are a lot of files already. But don’t worry, only three of them matter at the moment:
- The
main.tsFile, which contains the Code of your Plugin - The
styles.cssFile, which contains a corresponding Style Sheet - And the
manifest.jsonFile, which contains important Information, like the Version and Name of your Plugin
If you want to, you can already go ahead and look at these Files, you could for
example edit the manifest.json to your liking.
Obsidian cannot execute TypeScript files directly, you will need to compile them to JavaScript first. Luckily, everything, including bundling, is already set up correctly in the Sample Plugin, so you don’t have to worry too much about it 🥳.
Most Code Editors, like Visual Studio Code, already have a Terminal Window built in. You can use it to run the following two commands after one another:
npm install
npm run build
The First one will download and cache all dependencies, and the second one will compile and bundle all your Typescript Files to a single JavaScript File.
Once that’s done, go ahead and copy the styles.css, manifest.json and
main.js into a newly created Folder inside your Vault under
<your-vault>/.obsidian/plugins/sample-plugin/. Now go into Obsidian and enable
your Plugin in the Community Plugins Settings:
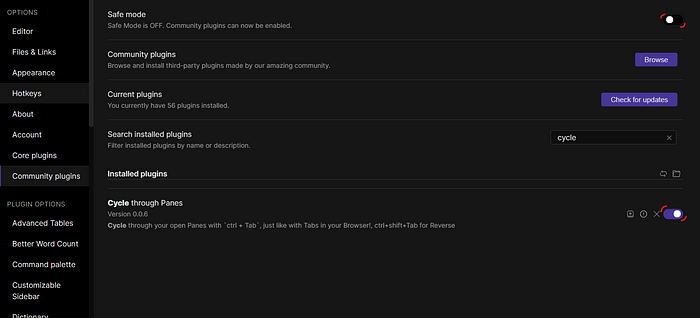
You will notice, that most Text turned red. This is because of the following CSS
inside the styles.css you just copied:
/* Sets all the text color to red! */
body {
  color: red;
}
This is just a demo to help you get started, you can delete it to revert to the default colors.
The sample plugin
Now that everything is set up, let’s look at the Plugins Code. Note that I stripped the SampleModal and SampleSettingTab at the End of the File.
import {
  App,
  Modal,
  Notice,
  Plugin,
  PluginSettingTab,
  Setting,
} from 'obsidian';

interface MyPluginSettings {
  mySetting: string;
}

const DEFAULT_SETTINGS: MyPluginSettings = {
  mySetting: 'default',
};

export default class MyPlugin extends Plugin {
  settings: MyPluginSettings;

  async onload() {
    console.log('loading plugin');

    await this.loadSettings();

    this.addRibbonIcon('dice', 'Sample Plugin', () => {
      new Notice('This is a notice!');
    });
    this.addStatusBarItem().setText('Status Bar Text');
    this.addCommand({
      id: 'open-sample-modal',
      name: 'Open Sample Modal',
      checkCallback: (checking: boolean) => {
        let leaf = this.app.workspace.activeLeaf;
        if (leaf) {
          if (!checking) {
            new SampleModal(this.app).open();
          }
          return true;
        }
        return false;
      },
    });
    this.addSettingTab(new SampleSettingTab(this.app, this));
    this.registerCodeMirror((cm: CodeMirror.Editor) => {
      console.log('codemirror', cm);
    });
    this.registerDomEvent(document, 'click', (evt: MouseEvent) => {
      console.log('click', evt);
    });
    this.registerInterval(
      window.setInterval(() => console.log('setInterval'), 5 * 60 * 1000)
    );
  }

  onunload() {
    console.log('unloading plugin');
  }

  async loadSettings() {
    this.settings = Object.assign({}, DEFAULT_SETTINGS, await this.loadData());
  }

  async saveSettings() {
    await this.saveData(this.settings);
  }
}
Line 1: Import premade Functions and Components from Obsidian, so you can use them in your Plugin
Line 3–9: The Settings the Plugin can store and the default Values
Line 11: A class extending “Plugin” is exported. This is always necessary for a Plugin.
Line 14: The onload() Function. This is called every time a Plugin is
loaded in Obsidian. It adds a lot of Stuff in the sample Plugin, but that’s just
to explain how it works. You can ignore most of them.
Line 17: The Settings are loaded into Obsidian. They are stored on the Disk to persist even when Obsidian is closed. You can see the corresponding Function at the bottom (Line 51).
Line 47: The onunload() Function does the same thing as onload(), but
when the Plugin is disabled. Note that this isn’t called when Obsidian closes.
There will also be two more classes. One extends the “Modal” Component and another one which extends “SettingTab”. These are used to create a dedicated Tab in the Settings or to show these nifty pop-up Modals.
Recreating Cycle through Panes
In our Case, we don’t need most of this. Our Plugin won’t even have configurable Settings. But what does it need to do? If you are reading this you are most likely using a Browser, to switch between your open Tabs you can press Ctrl + Tab. Cycle through Panes replicates that behavior with Panes in Obsidian. So, what we need to do is the following:
- Add a Command to go to the next Pane, triggered by Ctrl + Tab
- Add a Command to go to the previous Pane, triggered by Ctrl + Shift + Tab
Let’s use the following as our Starting Point:
import { MarkdownView, Plugin, WorkspaceLeaf } from 'obsidian';

export default class CycleThroughPanes extends Plugin {
  onload() {
    console.log('loading plugin: Cycle through panes');
  }

  onunload() {
    console.log('unloading plugin: Cycle through panes');
  }
}
This is almost the bare minimum you will need for any Plugin. Inside the
onload() method, we will be adding the two Commands. The Obsidian API exposes
a method on the Plugin Class to add commands, if you add them using this
official way the User will also be able to change Hotkeys, just like with every
other Command! If you want to read up on it, see the
official Type Definition.
The addCommand() method takes a
Command Object
as a parameter, which has fields for a name, which is going to be the display
Text, an ID, which is basically the internal name, and a callback, which is a
function that will be executed every time the command is invoked. Instead of
using a regular callback, one can use a checkCallback, editorCallback or
editorCheckCallback. A regular callback can be invoked from everywhere in
Obsidian, while any of the two editorCallback’s only work while an Editor is
active, the Editor instance will also be available inside the function as a
parameter. The checkCallback’s are used if you need to implement your own Logic
on when the Callback can be invoked. As an example, the sample implementation
for that only works when there is an active Leaf. Other optional fields are
mobileOnly, icon (mainly for Obsidian Mobile’s Toolbar) and hotkeys.
Let’s just create the forward cycle first: Add an ID, name and a checkCallback, for now you can use an empty arrow function here. If you want to, you can also set default Values for the Hotkeys already, but it is generally advised to not do that to avoid conflicts between Plugins. It should look something like this:
import { MarkdownView, Plugin, WorkspaceLeaf } from 'obsidian';

export default class CycleThroughPanes extends Plugin {
  onload() {
    console.log('loading plugin: Cycle through panes');

    this.addCommand({
      id: 'cycle-through-panes',
      name: 'Cycle through Panes',
      checkCallback: (checking: boolean) => {},
    });
  }

  onunload() {
    console.log('unloading plugin: Cycle through panes');
  }
}
Now that we have that, how do we implement the rest?
import { MarkdownView, Plugin, WorkspaceLeaf } from 'obsidian';

export default class CycleThroughPanes extends Plugin {
  onload() {
    console.log('loading plugin: Cycle through panes');

    this.addCommand({
      id: 'cycle-through-panes',
      name: 'Cycle through Panes',
      checkCallback: (checking: boolean) => {
        let active = this.app.workspace.activeLeaf;
        if (active) {
          if (!checking) {
            let leafs = this.app.workspace.getLeavesOfType('markdown');
            let index = leafs.indexOf(active);
            if (index === leafs.length - 1) {
              this.app.workspace.setActiveLeaf(leafs[0], true, true);
            } else {
              this.app.workspace.setActiveLeaf(leafs[index + 1], true, true);
            }
          }
          return true;
        }
        return false;
      },
    });
  }

  onunload() {
    console.log('unloading plugin: Cycle through panes');
  }
}
In Line 12 we store the currently active leaf inside a variable called “active”. If there is no active Leaf, this will be null and thus the callback will return false and not work nor show up in the Command Palette. If the User invoked the command the passed checking variable will be false and thus our Logic will run.
In Line 15 we first get all Markdown Leaves and right after get the Index of the currently active Leaf.
Now we need to handle an interesting Case. If the active Pane is the last one and the User switches to the next one, we want to set the first Pane as active. This is handled by the if statement. If this is not the case, we can simply increment the index by one.
Now the only thing that’s missing is the same Command, but to go in reverse, from right to left. We can copy almost all the Code, except that we need to change the ID, name and callback a little bit. In the next Block, you will see the complete Code:
import { MarkdownView, Plugin, WorkspaceLeaf } from "obsidian";

export default class CycleThroughPanes extends Plugin {

  setActiveLeaf(leaf: WorkspaceLeaf): void {
    this.app.workspace.setActiveLeaf(leaf);
    (leaf.view as MarkdownView).editor.focus();
  }

  onload() {
    console.log('loading plugin: Cycle through panes');

    this.addCommand({
      id: 'cycle-through-panes',
      name: 'Cycle through Panes',
      checkCallback: (checking: boolean) => {
        let active = this.app.workspace.activeLeaf;
        if (active) {
          if (!checking) {
            let leafs = this.app.workspace.getLeavesOfType("markdown");
            let index = leafs.indexOf(active);
            if (index === leafs.length - 1) {
              this.app.workspace.setActiveLeaf(leafs[0], true, true);
            } else {
              this.app.workspace.setActiveLeaf(leafs[index + 1], true, true);
            }
          }
          return true;
        }
        return false;
      }
    });

    this.addCommand({
      id: 'cycle-through-panes-reverse',
      name: 'Cycle through panes (Reverse)',
      callback: () => {
        let active = this.app.workspace.activeLeaf;
        let leafs = this.app.workspace.getLeavesOfType("markdown");
        let index = leafs.indexOf(active);
        if (index) {
          if (index === 0) {
            this.app.workspace.setActiveLeaf(leafs[leafs.length - 1], true, true);
          } else {
            this.app.workspace.setActiveLeaf(leafs[index - 1], true, true);
          }
        }
      }
    });

  onunload() {
    console.log('unloading plugin: Cycle through panes');
  }
}
Publishing a Plugin
Now everything that’s left to do is publish the Plugin. This involves 4 Steps, filling out the manifest.json, pushing the Code to GitHub, creating a Release on GitHub and finally making a Pull Request to the obsidian-releases Repository with your Plugin’s information.
Filling out the manifest
The Manifest has 8 fields, the ID and name, which is almost the same as in a Command, the version, which should follow Semantic Versioning, the minAppVersion, which is the minimal Obsidian Version that your Plugin depends on, this might change if Obsidian’s API changes. A description which is used for the search in the Plugin Browser, the author and authorUrl, which should be you and your website or GitHub Profile and lastly the isDesktopOnly field, which needs to be set to true if your Plugin interacts with NodeJS or you are relying on CodeMirror 5.
Pushing to GitHub
This step is super easy if you already created a Repository in the first step of this Post. Just run the following Commands:
git add .
git commit -m "Initial Release of a super awesome Plugin"
git remote add origin <url from step 1>
git push origin
Creating a Release on GitHub
On the right-hand side, click on “Create new release”. Inside the “Choose a Tag” field, add the current version of your Plugin without a v at the front. This needs to match your manifest.json. If you want, you can add a description and a Title, but thats optional. What you will need to do, is adding the main.js (run npm run build to compile it), manifest.json and if you have one styles.css at the bottom. Once you are ready, hit “Publish Release”.
Adding the Plugin to the Community Plugins
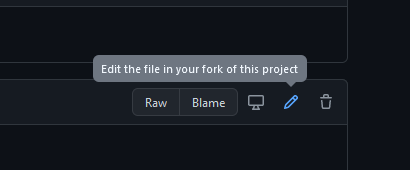
Go to the official Obsdian-Releases Repository and open the Community Plugins File. On the top right, hit Edit and add your Plugin to the end of the List like so:
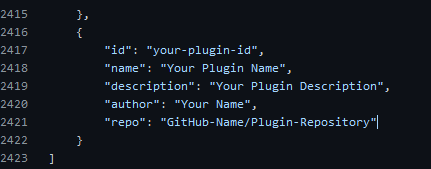
You just need to make sure to not miss any commas and double-check the Repository Name. After that, you can click on “Propose Changes” and simply follow the Instructions given by the Obsidian Developers. You are done 🥳!